
Custom Shortcuts
Do you ever find yourself using the same programs over and over? You could create a desktop shortcut for each of them, but this often leaves your desktop cluttered and not very productive. A more favourable alternative is to use custom shortcuts.
To add a custom shortcut to a program, you simply need to do the following:
1) Navigate to the program you want to add a custom shortcut to. The easiest way to do this is most commonly the start menu.

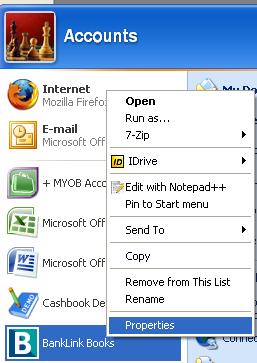
Selecting a commonly used program, which in our case would be Banklink
2) Right click on the program and select ‘Properties’
3) You should see ‘Shortcut Key:’ somewhere below. Click in the box next to it.

Entering the appropriate shortcut key information
4) Enter the shortcut key that you want to use to open the program. If a single character is entered, Windows will automatically add ‘CTRL’ or ‘ALT’ to the shortcut so that it doesn’t interfere with other functions. Having Paint open every time you press ‘P’ would become annoying very quickly!
5) Click ‘Apply’, then click ‘OK’
That’s all there is to it! With a little bit of memorising, you should be able to have all of your commonly used programs up and running even faster now, and your desktop will look much nicer.