
Tables and Lists
I’m a firm believer in making use of features provided to make your life easier. I find it’s always best to start with the basics and learn additional features later on. Since we’re talking Excel, things like macros and advanced formulas can take quite a long time to learn and build, and there’s no point spending time re-making something thats already been done, especially if its done better than your own implementation.
Microsoft Excel 2007 has such a feature which I like to use when the situation is right: Tables (known as Lists in Excel 2003). Microsoft Excel Help describes tables as: “… related data in a series of worksheet rows and columns that have been formatted as a table”. Tables are basically a self-managing range that expands and contracts as data is modified. The ability to add rows to a table while keeping the subtotal and not disturbing data on either side of the table is normally the reason I will use a table. There are many other benefits including the ability to give tables default formatting, filters on the table, easy sorting and special access in VBA.
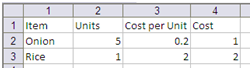
They’re quite difficult to explain, so let’s start off with a simple shopping list:
| 2003 – Excel LIST | 2007 – Excel TABLE |
 |
 |
Note: I use the R1C1 referncing style. It has several benefits including being significantly easier to refer to the current row or column in formulas.
Creating the Table
Select the Data, then convert it into a Table/List:
| Data > List > Create List… | Insert > Tables > Table |
 |
 |
Total Row
Select a cell in the table and add a Total row:
| Data > List > Total Row | Design > Table Style Options > Total Row |
 |
 |
Adding a custom total row is just as easy, and as data is added to the table it will also shift down underneath it. It has one drawback: it handles additional data, but when rows are deleted, the custom total row wont automatically shift up. You have to do that bit on your own.
Insert Data
The best way to insert a new row of data for both is to just tab into a new row. That is, select the last cell of the last row of data, and hit tab. If you want to extend the number of rows by more than 1 at a time, or extend the number of columns, select the entire table then drag the bottom right corner to the new table size required:
 |
 |
Formatting the Table
| Data > List > Hide Border of Inactive Lists | Table Tools > Design > Table Styles |
 |

|

To get an effect similar to that in 2007 you can use Cell Styles and conditional formatting.
Sorting and Filtering
To sort and filter the information in the table, use the Auto-filter drop-downs that appear on the header row:
 |
 |
Assigning Named Ranges to Tables (for Excel formulas)
Note: My preference with working in Excel VBA is to always refer to named ranges. That way if you need to rearrange things, you just need to make sure the named ranges are correct and the code doesn’t change! This section is also related to the following section on accessing tables in VBA.
| In Excel 2003, you will need to create your own named range. You can do this by selecting the entire table and typing in a suitable reference name in the reference box to the left of the formula bar. Here, we’ve named it Table1: | Excel 2007 you have direct access to the table reference, which will work similar to a named range. However, this will not appear in the 2003 name manager and so should not be referred to using formulas! If you expect to need to refer to the table in both 2007 and 2003, create your own named range in the Name Manager. The screenshot below shows Excel 2007’s default name for a new Table: |
 |
 |
Once you have the ranges named, you can then make use of them in formulas.
Accessing Tables in Excel VBA
If you need to access your 2003-based list via VBA, you’re going to be wishing you made it in 2007. If you created the table in Excel 2007, regardless of whether you’re using 2003 or 2007, the table/list will be named as its displayed in 2007 (see above). The default is “Table1” for the first table, which you may rename using the name manager in 2007. Assuming you’re working on Sheet1, the reference to the table will be something like:
Sheet1.ListObjects(“Table1”)
In Excel 2003, you’re going to first need to work out which list is which. The best way is to make changes to each of the lists in VBA to confirm which is which for each sheet. For now, go through each list you have on each sheet and note down the names. If you only have one list, you can get the name this way:
Debug.Print Sheet1.ListObjects(1).Name
Once you have renamed the table to something more suitable either through the name manager in 2007 or VBA and have a reference to it, we can use the VBA methods to modify it. The ones I use most are below.
.ListRows(1) – Get the first row
.ListRows.Add – Add a new row
.ListRows(1).Delete – Delete the first row
.ListRows.Count – Get the number of rows
.Range.Sort … – Perform a sort on the table. Note the Range doesnt have any arguments in this case – It will reference the entire table contents.